
price: $138.99 Last updated: 09/02/2016
- Coverage for product breakdowns and malfunctions
- 24/7 customer support
- Free shipping on all repairs with no deductibles or hidden fees
- Fully transferable with gifts. Cancel anytime, full refund in the first 30 days
- If you purchase this service plan and eligible product for this service plan, you acknowledge that Amazon may send the service plan seller relevant product and price information for the purpose of administering the plan
Product Description
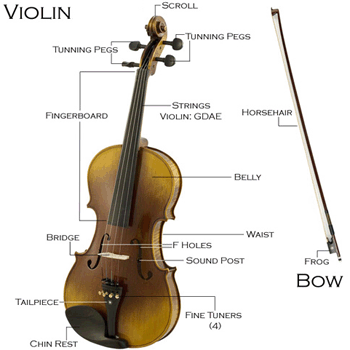
Violin Parts
From the Manufacturer
All
of our violins are handcrafted instruments that are tested at our
factory and inspected again by skilled technicians at our Los Angeles
distribution center prior to shipping. Please read the setup and tuning
instructions carefully after receiving the violin. It will help you
understand how to set up and tune the violin.
Violin Owner's Manual
Exposure
to sudden changes in temperature and humidity can affect your violin.
Avoid direct, extended exposure to: sunlight, rain, heaters, or air
conditioners. Violins are delicate instruments and can be damaged easily
if not handled with care. The violin needs to be assembled and tuned
prior to playing. We recommend first time players to seek assistance
from an instructor. If an instructor is not available, follow these
steps below.
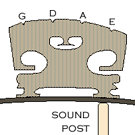
Bridge
Setting Up the Bridge
The
bridge is a very important piece because it transmits the sound of the
violin. The tension between the strings and the top of the violin keeps
the bridge in place. Bridges are not glued on the instruments. Keep in
mind that not all players have the same size hands and fingers making
the size of the bridge different for every player. The bridge can be
customized by a violin luthier in order to draw out a better tone from
the violin. If the bridge is not set, follow these simple instructions.
First, position the bridge with higher side of the bridge under the
lowest string, the G string. Tilt the bridge up under the strings toward
the tailpiece and set it at a 90-degree angle. If the bridge cannot be
tilted, the strings are too tight. Loosen the strings slowly and just
enough to hold the bridge in place. Align the feet of the bridge with
the two notches of the "F" holes and align the bridge evenly with the
fingerboard. Evenly spaced out the strings on the bridge. To tighten the
strings, turn the pegs clockwise while pushing them towards the peg box
for better grip and stability. If the pegs are slipping, use peg drop
oil to lock the pegs in place or use rosin powder as a substitution.
Applying Rosin Cake on the Bow
Keep
in mind, the bow must be tightened and rosined in order to produce a
sound on the violin. Also do not touch the hair on the bow since the
oils from the skin can damage the hair.To tighten the hair, tighten the
screw below the frog. Be careful to not over tighten the bow. Ideally,
the distance between the hair and the lowest curve on the bow is about a
quarter inch (1/4"). It may vary to every player. The hair should have a
slight bounce to it. Test the bow on the strings. A new rosin cake will
be too smooth to apply to the hair. To turn the rosin to powder, take a
pocketknife and cut three to four parallel lines on the rosin so that
there will be texture to the rosin. Sandpaper is an alternative to help
roughen the surface. Hold the frog on the bow and slowly rub the hair
over the rosin from the frog to the tip of the bow. Be careful not to
rub the bow too quickly. On a new bow, continue this process for
approximately 5-10 minutes. Test the bow to determine if the rosin is
adhering to the hair. If a clear pitch is emitted as the bow is drawn
over the strings, play a few notes and its ready to go. If there is no
tone or volume emitting from the strings the bow is not grabbing the
strings enough to generate a note, try applying more rosin.
Tuning
Gradually
tighten each string in the sequence of G-D-A-E. Starting with the
thicker string is to prevent damages to the thinner A and E strings.
Tighten one strings at a time, and only 1 to 2 notes higher. Do not
tighten one string all the way to the desired pitch while leaving the
other strings very loose. Doing so will create unequal pressure on the
bridge causing it to fall. Generally, strings take time to wear/settle
in. New strings tend to lose their tension quicker than older used
strings. To accelerate the process of wearing in new strings, tune the
strings to the desired pitch then slightly pull on the strings to
stretch them out. After pulling on the string, most likely it will need
to be re-tune. If the string pitch is sharp (high) loosen the string
slightly until the string pitch is flat (low). Slightly tighten the peg
until desired pitch is reach. Adjust the pegs to make larger adjustments
and the fine tuners to make smaller adjustments.
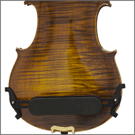
Shoulder Rest
Attaching the Shoulder Rest (Available in size 4/4 to 1/10)
First,
loosen the screws on the back of the shoulder rest. Then adjust the
feet to length of the lower bout of the violin. Tighten the screws back
to hold position. The feet of the shoulder rest clamp on the edges of
the lower bout of the violin. Gently spread the feet to fit over the
edge and snap in place.
Slippery Pegs
The
pegs can shrink or expand due to the temperature and humidity changes.
When the peg shrink, it will not fit the peg hole as well as they were
originally made. It will leave a little gap between the peg and peg
hole. This is why the pegs slip. Simply apply the rosin powder or peg
drop oil on the pegs and peg hole. This will fill the little gap in
between and increase friction. New strings will require some stretching
before they settle in and hold pitch. Slightly pull the strings upwards
to accelerate the settling in process. Keep in mind that adjusting the
pegs make larger adjustments and the fine tuners make smaller
adjustments. Periodically, check the violin's tune. Depending on the
weather (temperature and humidity level), the amount of time and type of
playing, the violin may need to be re-tune. In ideal conditions, this
would not be necessary.